Introduction
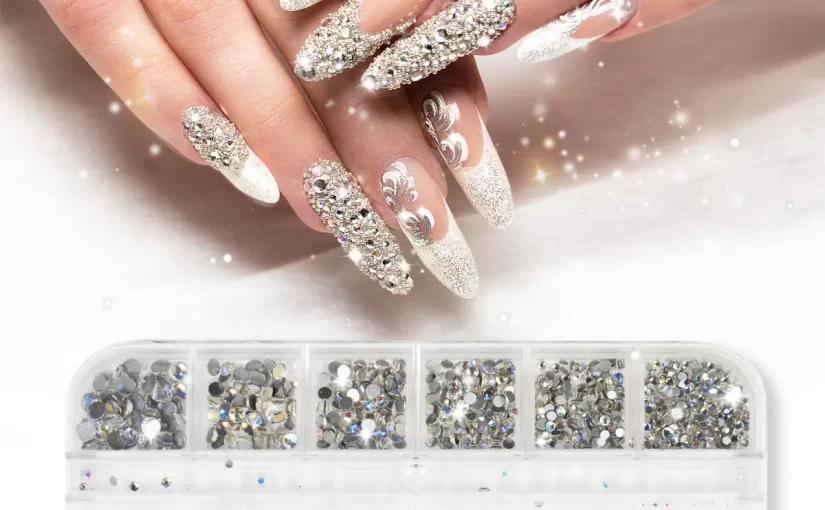
Glitter rhinestones for nails(French: strass à paillettes pour ongles) have become a staple in the world of nail art, adding an extra layer of sparkle and glamour to any manicure. Whether you’re looking for a subtle shimmer or a bold statement, glitter rhinestones can transform your nails into a dazzling masterpiece. In this comprehensive guide, we will explore everything you need to know about glitter rhinestones for nails. From understanding the different types of rhinestones to mastering application techniques, we’ll cover it all. Let’s dive into the world of glitter rhinestones and discover how they can elevate your nail game.

Understanding Glitter Rhinestones
Types of Glitter Rhinestones
There are various types of glitter rhinestones available in the market, each offering unique characteristics and effects. The most common types include:
- Flat Back Rhinestones: These are the most popular type of rhinestones used in nail art. They have a flat back that adheres easily to the nail surface.
- Hot Fix Rhinestones: These rhinestones come with heat-sensitive adhesive on the back, making them easy to apply using a hot fix applicator.
- Crystal Rhinestones: Known for their high-quality shine and brilliance, crystal rhinestones add a luxurious touch to any manicure.
- Colorful Rhinestones: Available in a wide range of colors, these rhinestones allow you to match or contrast with your nail polish for a personalized look.
Benefits of Using Glitter Rhinestones
Using glitter rhinestones offers several benefits that make them a favorite among nail enthusiasts. Some key advantages include:
- Versatility: Glitter rhinestones can be used on any type of nail, whether natural, gel, or acrylic. They also work well with various nail polish finishes, from matte to glossy.
- Customization: With a plethora of sizes, shapes, and colors available, glitter rhinestones allow for endless customization options. You can create unique designs tailored to your personal style.
- Durability: When applied correctly, glitter rhinestones can last for weeks without falling off, ensuring your manicure stays intact and beautiful.
- Affordability: Compared to other nail embellishments, glitter rhinestones are relatively inexpensive, making them accessible to everyone.

Choosing the Right Glitter Rhinestones
Size Matters
Selecting the right size of glitter rhinestones is crucial to achieving the desired effect on your nails. Here are some guidelines to consider:
- Small Rhinestones (1-2mm): Ideal for creating delicate patterns or adding subtle sparkle. They work well on smaller nail surfaces and can be used to accentuate specific areas.
- Medium Rhinestones (3-5mm): Perfect for more prominent designs, such as clusters or lines. Medium-sized rhinestones provide a balanced amount of sparkle without overwhelming the nail.
- Large Rhinestones (6mm+): Suitable for making a bold statement. Large rhinestones can serve as focal points on accent nails or create eye-catching designs when used sparingly.
Shape Selection
The shape of the glitter rhinestones can significantly impact the overall look of your manicure. Consider the following popular shapes:
- Round Rhinestones: The most versatile shape, round rhinestones can be used in almost any design. They provide a classic and elegant appearance.
- Square Rhinestones: Offer a modern and geometric look. Square rhinestones can be arranged in patterns or used individually for a clean, sharp effect.
- Heart-Shaped Rhinestones: Add a romantic and playful touch to your manicure. Heart-shaped rhinestones are perfect for special occasions like Valentine’s Day or weddings.
- Star-Shaped Rhinestones: Create a celestial theme or add a pop of fun to your nails. Star-shaped rhinestones are ideal for themed manicures or holiday celebrations.

Preparing for Application
Nail Surface Preparation
Before applying glitter rhinestones, it’s essential to prepare the nail surface properly. Follow these steps to ensure optimal adhesion and longevity:
- Cleanse the Nails: Remove any oils, lotions, or polish residues from the nails using a nail cleanser or acetone-free nail polish remover. This step ensures a clean surface for better adhesion.
- File and Buff: Gently file the nails to achieve the desired shape and smoothness. Buffing the nails lightly can help remove any rough edges and create a polished base.
- Apply Base Coat: Apply a thin layer of clear base coat to protect the nails and provide a smooth surface for the rhinestones. Allow the base coat to dry completely before proceeding.
Tools and Materials Needed
Having the right tools and materials on hand can make the application process smoother and more efficient. Here’s a list of essentials:
- Adhesive: Choose between liquid adhesive or a hot fix applicator depending on the type of rhinestones you’re using. Ensure the adhesive is suitable for nail use and dries quickly.
- Rhinestone Tweezers: Precision tweezers are necessary for picking up and placing the rhinestones accurately. Look for tweezers with a fine tip for better control.
- Nail Polish Top Coat: A clear top coat serves as a protective layer over the rhinestones, sealing them in place and enhancing the overall finish.
- Cotton Swabs and Nail Polish Remover: Keep cotton swabs and nail polish remover handy for cleaning up any mistakes or excess adhesive during the application process.

Application Techniques
Direct Adhesive Method
The direct adhesive method is one of the simplest ways to apply glitter rhinestones. Follow these steps for a flawless application:
- Prepare the Adhesive: If using liquid adhesive, apply a small drop directly onto the nail where you want to place the rhinestone. For hot fix rhinestones, heat the applicator according to the manufacturer’s instructions.
- Pick Up the Rhinestone: Use precision tweezers to pick up the rhinestone by its edge. Make sure to hold it securely but gently to avoid damaging the stone.
- Place the Rhinestone: Carefully place the rhinestone onto the prepared adhesive spot. Press down lightly to ensure proper adhesion. Repeat the process for additional rhinestones as needed.
- Seal with Top Coat: Once all the rhinestones are in place, apply a thin layer of clear top coat over the entire nail. This step helps secure the rhinestones and provides a glossy finish.
Decal Transfer Method
The decal transfer method involves using pre-made decals with rhinestones embedded in them. Here’s how to apply them:
- Choose a Decal: Select a decal design that complements your nail polish and overall aesthetic. Popular themes include floral patterns, geometric shapes, and abstract designs.
- Prepare the Decal: Cut out the desired section of the decal, leaving a small border around the rhinestones. Soak the decal in water for about 10 seconds to activate the adhesive.
- Apply the Decal: Gently lift the decal from the backing paper and position it on the nail. Smooth out any air bubbles or wrinkles using a soft brush or orangewood stick.
- Seal with Top Coat: After allowing the decal to settle, apply a clear top coat to seal the design and protect the rhinestones. This method ensures a professional-looking manicure with minimal effort.
Part 5: Creative Designs and Inspiration
Classic Designs
Classic designs featuring glitter rhinestones never go out of style. Here are some timeless ideas to try:
- French Tip with Rhinestones: Enhance the traditional French tip manicure by adding a row of tiny rhinestones along the free edge of the nails. This simple addition creates a sophisticated and elegant look.
- Accent Nail with Cluster: Choose one nail as the accent nail and adorn it with a cluster of medium-sized rhinestones. Arrange them in a circular pattern or scattered randomly for a glamorous effect.
- Minimalist Stripe: Create a minimalist yet chic design by placing a single line of small rhinestones vertically or horizontally across the nail. Pair this with a neutral polish for a subtle yet striking manicure.
Themed Manicures
Themed manicures offer a fun way to express creativity and celebrate special occasions. Here are some inspiring ideas:
- Holiday Cheer: Incorporate festive elements into your manicure by using red and green rhinestones for Christmas or pastel-colored stones for Easter. Add seasonal motifs like snowflakes or eggs to complete the look.
- Wedding Elegance: For brides-to-be, consider using clear or silver rhinestones to create a delicate and refined manicure. Place a few strategically on the ring finger or arrange them in a heart shape for added romance.
- Glam Rock: Channel your inner rockstar with a bold and edgy manicure. Mix black and metallic rhinestones with dark nail polish for a dramatic and rebellious look. Experiment with unconventional shapes and placements for maximum impact.

Maintenance and Removal
Caring for Glitter Rhinestones
To ensure your glitter rhinestones stay in place and maintain their sparkle, follow these maintenance tips:
- Avoid Water Exposure: Prolonged exposure to water can weaken the adhesive bond. Try to minimize contact with water, especially when washing dishes or swimming.
- Protect from Heat: High temperatures can cause the adhesive to melt or deteriorate. Avoid exposing your nails to excessive heat sources, such as hairdryers or saunas.
- Use Gentle Cleansers: When cleaning your hands, opt for gentle cleansers that do not contain harsh chemicals. Harsh soaps can strip away the protective top coat and loosen the rhinestones.
- Reapply Top Coat: Periodically reapply a clear top coat to reinforce the seal and extend the life of your manicure. This step also helps prevent chipping and peeling.
Proper Removal Techniques
When it’s time to remove the glitter rhinestones, it’s important to do so carefully to avoid damaging your nails. Follow these steps for a safe and effective removal:
- Soften the Adhesive: Soak a cotton ball or pad in acetone-based nail polish remover and place it over the rhinestone. Hold it in place for a few minutes to soften the adhesive.
- Gently Lift the Rhinestone: Use a wooden cuticle stick or orangewood stick to gently lift the edges of the rhinestone. Work slowly and carefully to avoid pulling at the nail surface.
- Clean the Nail Surface: Once the rhinestones are removed, clean the nail surface thoroughly with nail polish remover to remove any remaining adhesive residue.
- Moisturize and Protect: After removing the rhinestones, apply a moisturizing cuticle oil to hydrate and nourish your nails. This step promotes healthy nail growth and prevents brittleness.
By incorporating glitter rhinestones into your nail routine, you can create stunning and personalized manicures that reflect your unique style. Whether you prefer classic elegance or bold creativity, glitter rhinestones offer endless possibilities for self-expression. With the right knowledge and techniques, you can master the art of glitter rhinestones and enjoy dazzling nails that turn heads wherever you go.