Introduction to Homemade Liquid Hand Soap
Learning how to make liquid hand soap at home can be a rewarding endeavor. It allows you to customize your soap according to your personal preferences and needs. Whether it’s creating a unique fragrance or formulating a skin-nourishing blend, the process of making liquid hand soap opens up a world of possibilities. In this blog, we’ll explore the simple steps involved in crafting your own liquid hand soap, with a focus on using easy-to-source ingredients and straightforward methods. By the end of this guide, you’ll not only understand the basics of how to make liquid hand soap but also enjoy the benefits of a handmade product that’s both gentle on the skin and effective for cleaning.
Essential Ingredients for Liquid Hand Soap
To start your journey on how to make liquid hand soap, gathering the right ingredients is crucial. These ingredients are the foundation of your soap and will determine its quality, texture, and benefits.
Natural Oils and Fats
Natural oils and fats form the base of your liquid hand soap. They are responsible for the soap’s moisturizing properties and help to create a rich lather. Common choices include:
- Coconut oil for its rich foam and cleaning power.
- Olive oil, known for its gentle moisturizing effect.
- Castor oil to boost lather and provide softness to the skin.
- Sweet almond oil, which is great for sensitive skin.
- Shea butter for added moisture. It’s perfect for dry skin.
Choose oils that suit your skin’s needs or your personal preference. Combining different oils can also create a balanced product.
Lye Solution
Lye, or sodium hydroxide, is an essential ingredient in soap making. When mixed with water, it forms a lye solution that reacts with oils and fats to create soap through the process called saponification. Take extreme care when handling lye as it is caustic and can burn the skin. Always use distilled water to prevent impurities from affecting the reaction.
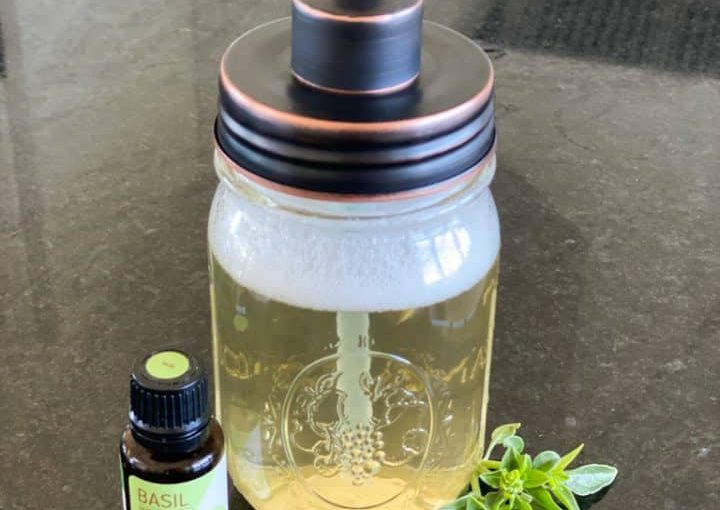
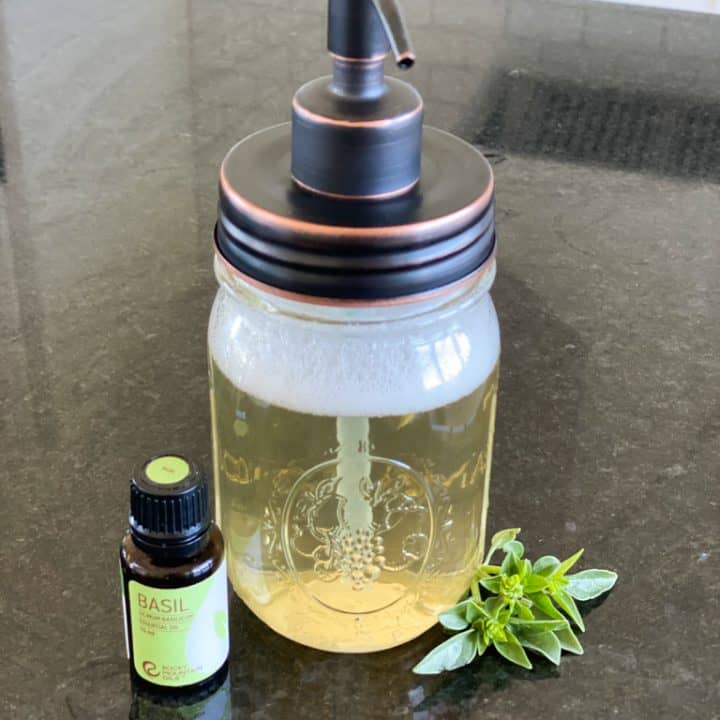
Additives and Fragrances
Additives and fragrances give your liquid hand soap its unique properties and pleasant aromas. Some popular options include:
- Essential oils like lavender, tea tree, or peppermint for natural scents.
- Glycerin to enhance moisturizing effects.
- Herbal infusions for additional skin benefits.
- Vitamin E for its antioxidant properties.
These additives not only personalize your soap but also enhance its skin-nourishing qualities. Remember to add them at the correct stage in the soap-making process to get the best results.
Tools and Equipment Needed
When learning how to make liquid hand soap, it’s important to have the right tools and equipment on hand. This ensures your soap-making process is safe, clean, and efficient. Here’s what you’ll need:
- Safety gear: Always wear gloves and safety goggles to protect your skin and eyes from lye.
- Large stainless steel pot: For mixing your oils and fats with the lye solution.
- Digital scale: To measure out precise amounts of ingredients.
- Thermometer: To monitor temperatures during the saponification process.
- Stick blender: To blend the oils and lye solution until they reach the right consistency.
- Glass jars or bowls: For measuring and storing liquids and other additives.
- Silicone spatulas: To stir and scrape the soap mixture without leaving residue.
- Soap molds or old clean bottles: To shape and store your liquid hand soap after it has cooled.
- pH test strips: To ensure the final product is skin-safe.
Make sure your workspace is well-ventilated, clean, and free from anything that could contaminate your soap. Before you begin, arrange all your tools and equipment within easy reach to streamline the soap-making process. Paying attention to this setup will help you focus on creating a quality product without interruption.

Step-by-Step Process of Making Liquid Hand Soap
Let’s walk through the journey of creating your own liquid hand soap from scratch. Follow these steps closely and you’ll be on your way to a customized, skin-loving cleanser. Remember to adhere to safety protocols throughout the entire process.
Creating the Soap Base
To begin, combine your chosen natural oils and fats in a large pot. Use a digital scale for accuracy. Heat the mixture gently, stirring occasionally until everything is well combined. Maintain a medium heat to avoid burning the oils.
Mixing and Blending
In a separate container, carefully dissolve the lye in distilled water to create the lye solution. This step is critical; handle with care. Once the oils and lye solution reach similar temperatures, slowly pour the lye into the oils while stirring continuously. Use a stick blender to mix until you achieve a smooth, consistent texture.
The Saponification Process
After blending, the saponification process begins. This chemical reaction will turn your mixture into soap over time. Monitor the mixture’s temperature with a thermometer, keeping it steady. The soap will start to thicken as saponification takes place. This step can take a few hours to complete.
Customizing Your Hand Soap
Now’s the time to add your personal touch. Stir in your chosen fragrances, additives, or colorants. Ensure all additional ingredients are blended well into the soap mixture. This customization will make your liquid hand soap unique and tailored to your preferences.
Tips for Perfecting Your Liquid Hand Soap
Creating liquid hand soap at home is an art that can be fine-tuned with practice. Here are essential tips to help you perfect your liquid hand soap:
Choose the Right Oils for Your Skin Type
Select oils that match your skin’s needs. For dry skin, opt for oils like olive or shea butter. Oily skin benefits from coconut or sweet almond oil. Mixing oils can balance the soap’s hydrating and cleansing qualities.
Achieve the Ideal Temperature Balance
Use a thermometer to ensure your oils and lye solution are at similar temperatures before combining. This helps the ingredients blend more smoothly and promotes an even saponification process.
Use Quality Distilled Water
Always use distilled water for your lye solution. It’s free from impurities that can hinder the reaction and affect the consistency of your soap.
Blend to the Right Consistency
A stick blender can be your best friend. Blend until the mixture reaches “trace,” the point where the soap leaves a lasting imprint when drizzled on its surface.
Add Additives and Fragrances at the Correct Time
Add your favorite scents and skin enhancers just before the soap starts to thicken. This ensures an even distribution without affecting the saponification.
Test the pH Balance
Before using your hand soap, test its pH with strips. Aim for a pH that is safe for skin, typically around 7 to 8.
Let it Cure
Patience is key. Allow your soap to cure properly. This waiting period can enhance the soap’s texture and performance.
Record Your Ratios
Note down your ingredient ratios and steps. This makes it easier to replicate your success or adjust for improvements.
By applying these tips and techniques, you’ll be well on your way to crafting a luxurious liquid hand soap that’s tailored to your needs and preferences. Remember, practice makes perfect, so keep experimenting until you find your ideal formulation.
Benefits of Using Homemade Liquid Hand Soap
Making your own liquid hand soap has a variety of benefits. Here’s why you might consider taking the time to craft it yourself:
- Customization: Tailor the soap to your skin’s needs and scent preferences.
- Savings: Homemade soap can be more cost-effective than store-bought alternatives.
- Natural Ingredients: You control what goes into your soap, avoiding harsh chemicals.
- Eco-Friendly: Reduce plastic waste by reusing containers for your hand soap.
- Fun and Fulfilling: Enjoy the creative process and the satisfaction of DIY.
- Gentle on Skin: Natural oils and fats ensure the soap is moisturizing.
- Health Benefits: Additives like essential oils can provide therapeutic qualities.
By creating your own liquid hand soap, you not only end up with a product that is better for your skin and pocket, but also contribute to a healthier environment. Plus, the joy you get from making something from scratch is an added bonus.
Troubleshooting Common Issues
Even with a good recipe and careful technique, you may encounter some challenges when learning how to make liquid hand soap. Here are solutions to common problems you might face:
Soap Does Not Reach Trace
If your mixture doesn’t thicken, it may not have reached ‘trace’. This could happen if:
- The lye solution was too cool when combined with the oils.
- Oils were not heated enough before mixing.
To fix this, ensure both the lye and oils are at recommended temperatures and blend well with a stick blender.
Soap Separates After Pouring
Separation can occur if the soap mixture wasn’t blended enough. To avoid this, blend until the mixture is smooth and consistent. If separation happens, blend the mixture again until it emulsifies.
Soap Is Too Thick or Slimy
High temperatures or overmixing can lead to thick or slimy soap. Check your temperatures and mix only until you reach trace. If soap is already too thick, gently reheat and add a bit of distilled water.
pH Is Too High
A high pH can make soap harsh on skin. If testing shows high pH levels, dilute the soap with distilled water and retest. Be sure to mix thoroughly after dilution.
By keeping track of your processes and adjusting as needed, you can overcome these issues and create a liquid hand soap that is just right. Remember to use safety precautions when handling ingredients and to take your time perfecting your technique. With a bit of troubleshooting, you’ll be able to craft a hand soap you’re proud of.
Storing and Using Your Liquid Hand Soap
After mastering how to make liquid hand soap, proper storage and usage are key for longevity. Here’s how to store and use your soap effectively:
Choosing the Right Container
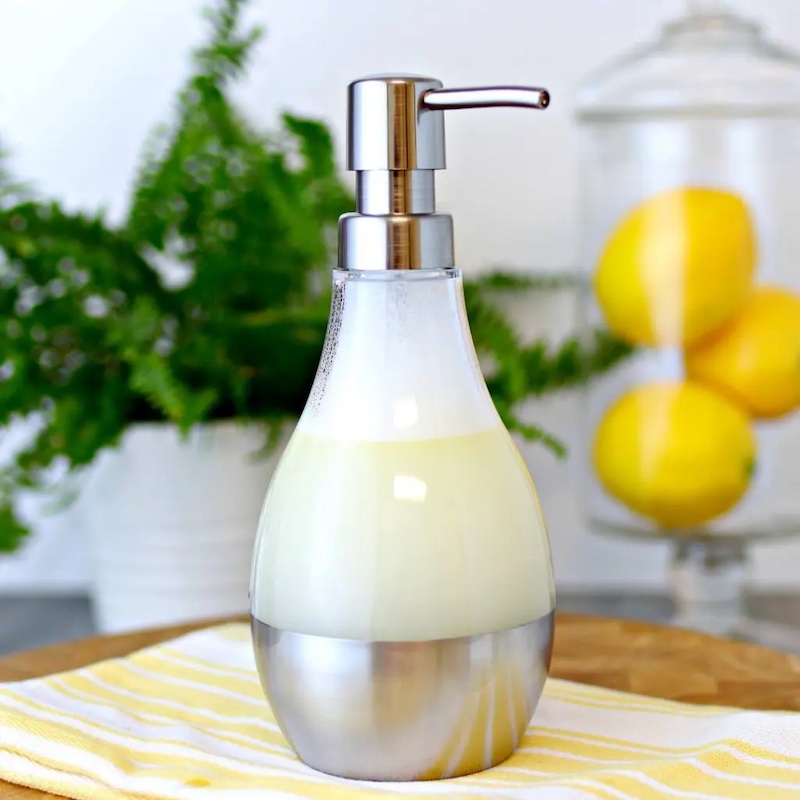
For storing your homemade liquid hand soap, opt for a container with a pump or squeeze top. This will make it easy to use and keep the soap fresh:
- Glass bottles with pumps add a stylish touch and are reusable.
- Plastic squeeze bottles are practical and suitable for all areas of the home.
- Recycled soap dispensers can be a budget-friendly and eco-friendly option.
Ensure that containers are clean and dry before filling them with your soap to avoid contamination.
Preserving Your Soap
To preserve your liquid hand soap, keep it in a cool, dry place away from direct sunlight. If you’ve made a large batch, consider using a preservative to prevent bacteria growth:
- Natural preservatives, such as grapefruit seed extract, can be used.
- Store a portion of the soap in a smaller container for daily use.
- Keep the rest in an airtight bottle to maintain freshness.
Daily Usage
To enjoy your liquid hand soap daily, follow these simple tips:
- Wet your hands first, then apply one or two pumps of soap.
- Lather for at least 20 seconds to clean effectively.
- Rinse well with water to remove any soap residue.
By using the correct amount, you’ll save soap and ensure your hands are properly cleaned.
Shelf Life Considerations
Homemade liquid hand soap typically has a shorter shelf life than commercial soaps. Note these points to maximize its lifespan:
- Mark the date of creation on the container to track usage.
- Use up the soap within a few months for best quality.
- Observe the soap’s look and smell for signs it’s time to make a new batch.
With proper storage and usage habits, your carefully crafted liquid hand soap can remain a staple in your daily routine, bringing both cleanliness and pleasure to your handwashing experience.
Conclusion: The Satisfaction of Handmade Soap
Taking the journey into how to make liquid hand soap is a fulfilling experience. Each step from selecting oils to customizing scents adds personal value to your final product. Not only do you gain a deeper understanding of the ingredients, but you also ensure what you’re using on your skin is safe and natural.
Homemade liquid hand soap offers the chance to get creative. You can tweak recipes to your liking and take pride in using a soap that’s truly your own creation. It becomes more than just a cleaning agent; it’s a representation of your preferences and care for your health.
Despite the challenges you may face in getting the blend or consistency just right, the outcomes are rewarding. You save money, reduce your environmental impact, and provide gentle care for your skin. Plus, sharing your handmade soap with friends and family can be a joy in itself.
Committing to how to make liquid hand soap at home is an investment in your well-being. With each batch, you’ll likely find the process easier and the results more satisfying. It’s about taking control, being resourceful, and enjoying the simple pleasures of DIY. Embrace the sense of achievement that comes with crafting something with your own hands.